If you go to your QM Editor and hit Ctl-F1, you'll open the help for QM. This is actually an extremely well documented program and the help is always my first stop. The first thing to do is click on the 'Index' tab and start entering 'Toolbar properties'; you'll notice that it jumps down the list as you type. Now, take a look at the entry for 'Toolbar properties'. We'll be doing some work in here in a bit but first open the properties of the toolbar (Ctl-p) and let's set it to open only when we have a certain window open.
Here's the properties window; now choose 'window' under the 'triggers' tab and then choose 'created and active'.
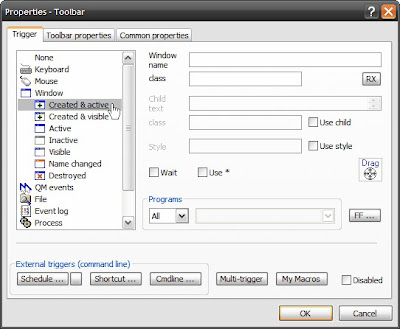
On the right you'll see a little icon that looks like a aiming reticle; click and drag that onto the window, who when starting up, will trigger the toolbar to open. You'll see it fill-in a bunch of info in the 'window name' field and probably the class as well. Edit the 'window name' field as needed as the toolbar will not open if the window tittle bar doesn't contain exactly what is in the field. For instance, if I want the toolbar to open when FireFox is started, it won't if I leave the value 'The Macro Hook - Mozilla Firefox' in the window field. To fix that, I'll just remove the first part and leave 'Mozilla Firefox' in there. I can also use the '*' wildcard by clicking the checkbox 'Use *' and put it in the field like this '*Mozilla Firefox'. And if you really want to let your Geek-Flag-Fly, start putting in Regular Expressions by hand or via the 'RX' button.
Now, let's say you want to make this toolbar (which should have a few buttons on it) sit on top of the window's title bar. Here's what we do. Run the tool bar and right click on it. Click on 'coordinates' and then 'top-right'. Also, make sure that 'Auto-Select' is unchecked. Now adjust the size by dragging the edges around. Once you have the size set to the way you want it, uncheck 'Sizing Border'. Now move it into place by dragging it into place with the right mouse button. Once it is set in place, it should move with the size of the window to always be next to the 'minimize' button.
Here's what I'm seeing.

Nice and very usable but let's see what else we can do. Open up the properties again and click on the 'Toolbar Properties' tab. Here you can see all kinds of hacking potential (i.e. 'Shrinked width', 'Text Colour', and 'Bitmap') but let's take a look at just one for now, 'Opacity'. I love this one! Windows opacity can be set from 0-255 (255 being standard Widows opaque and 0 being completely invisible). Now, set the Opacity for 150 and tab over to 'Transparent Colour' and click the button that says 'Back. Colour'. Hit 'Ok' and close your toolbar and open it again for the changes to take effect. Nice huh? Now, go back to the properties and take out the value for 'Opacity' and just leave the 'b' in the 'Transparent Colour'. Hit 'Ok' and restart your toolbar.....Even better huh? Notice the differences in the two? No lines just like the programmer put them there.

So now you know how to: build a toolbar; make it look like you want; and assign it's existence to only a particular window. There's plenty more you can do like: use a bitmap for the background (gradients are nice for this); have them shrink out of the way till you mouse-over them; and set different icons on them. Digg into them and you'll see all kinds of uses for them.
So have at it and I'll see you next time cause the hook always brings you back.

No comments:
Post a Comment